1.生命周期钩子对比(⭐️)
Vue 3 的生命周期可分为四大阶段,包含12个主要钩子函数:
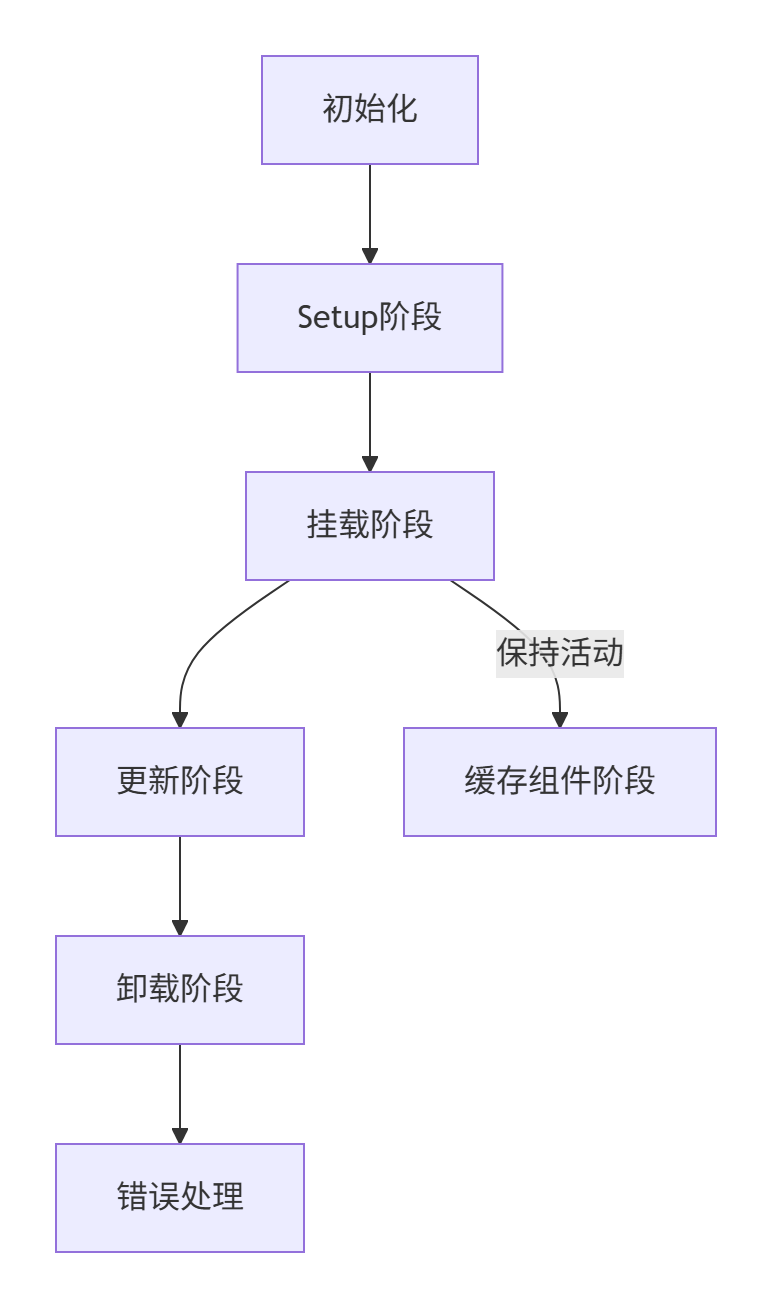
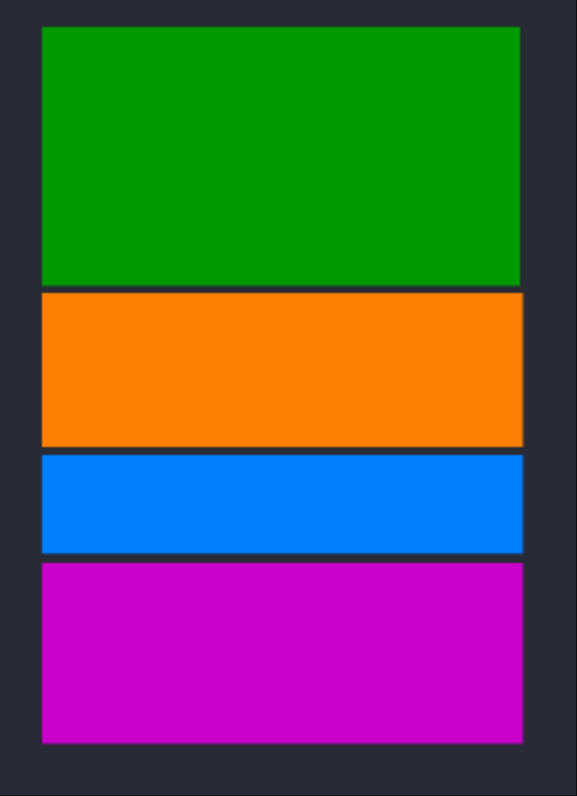
生命周期阶段概览
- 主要分为 4 个阶段:
- 初始化阶段: (用 setup 替代)
- 挂载阶段:
- 更新阶段:
- 卸载阶段:
Vue 选项式API vs 组合式API 生命周期对比
| 生命周期阶段 | 选项式 API | 组合式 API | 触发时机说明 |
|---|---|---|---|
| 初始化阶段 | |||
beforeCreate | ✅ 支持 | ❌ 不需要 (用 setup 替代) | 组件实例初始化前,无法访问数据和方法 |
created | ✅ 支持 | ❌ 不需要 (用 setup 替代) | 组件实例创建完成,可访问数据但未挂载 DOM |
| 挂载阶段 | |||
beforeMount | ✅ 支持 | onBeforeMount | DOM 挂载开始前,首次 render 调用前 |
mounted | ✅ 支持 | onMounted | DOM 挂载完成,可操作 DOM 或初始化第三方库 |
| 更新阶段 | |||
beforeUpdate | ✅ 支持 | onBeforeUpdate | 数据变化导致虚拟 DOM 重新渲染前,可获取更新前状态 |
updated | ✅ 支持 | onUpdated | 虚拟 DOM 重新渲染完成,避免在此修改状态(可能循环更新) |
| 卸载阶段 | |||
beforeUnmount | ✅ 支持 (Vue3) | onBeforeUnmount | 组件卸载前,清理定时器/事件监听 |
unmounted | ✅ 支持 (Vue3) | onUnmounted | 组件卸载后,所有子组件也已卸载 |
beforeDestroy | ✅ 支持 (Vue2) | ❌ 已废弃 | Vue2 的卸载前钩子 |
destroyed | ✅ 支持 (Vue2) | ❌ 已废弃 | Vue2 的卸载后钩子 |
| 缓存组件 | |||
activated | ✅ 支持 | onActivated | 被 <keep-alive> 缓存的组件激活时 |
deactivated | ✅ 支持 | onDeactivated | 被 <keep-alive> 缓存的组件失活时 |
| 错误处理 | |||
errorCaptured | ✅ 支持 | onErrorCaptured | 捕获后代组件错误时 |
| 调试钩子 | |||
| - | ❌ 不支持 | onRenderTracked | 开发模式下追踪响应式依赖时触发 |
| - | ❌ 不支持 | onRenderTriggered | 开发模式下响应式依赖触发重新渲染时 |
父子组件生命周期顺序
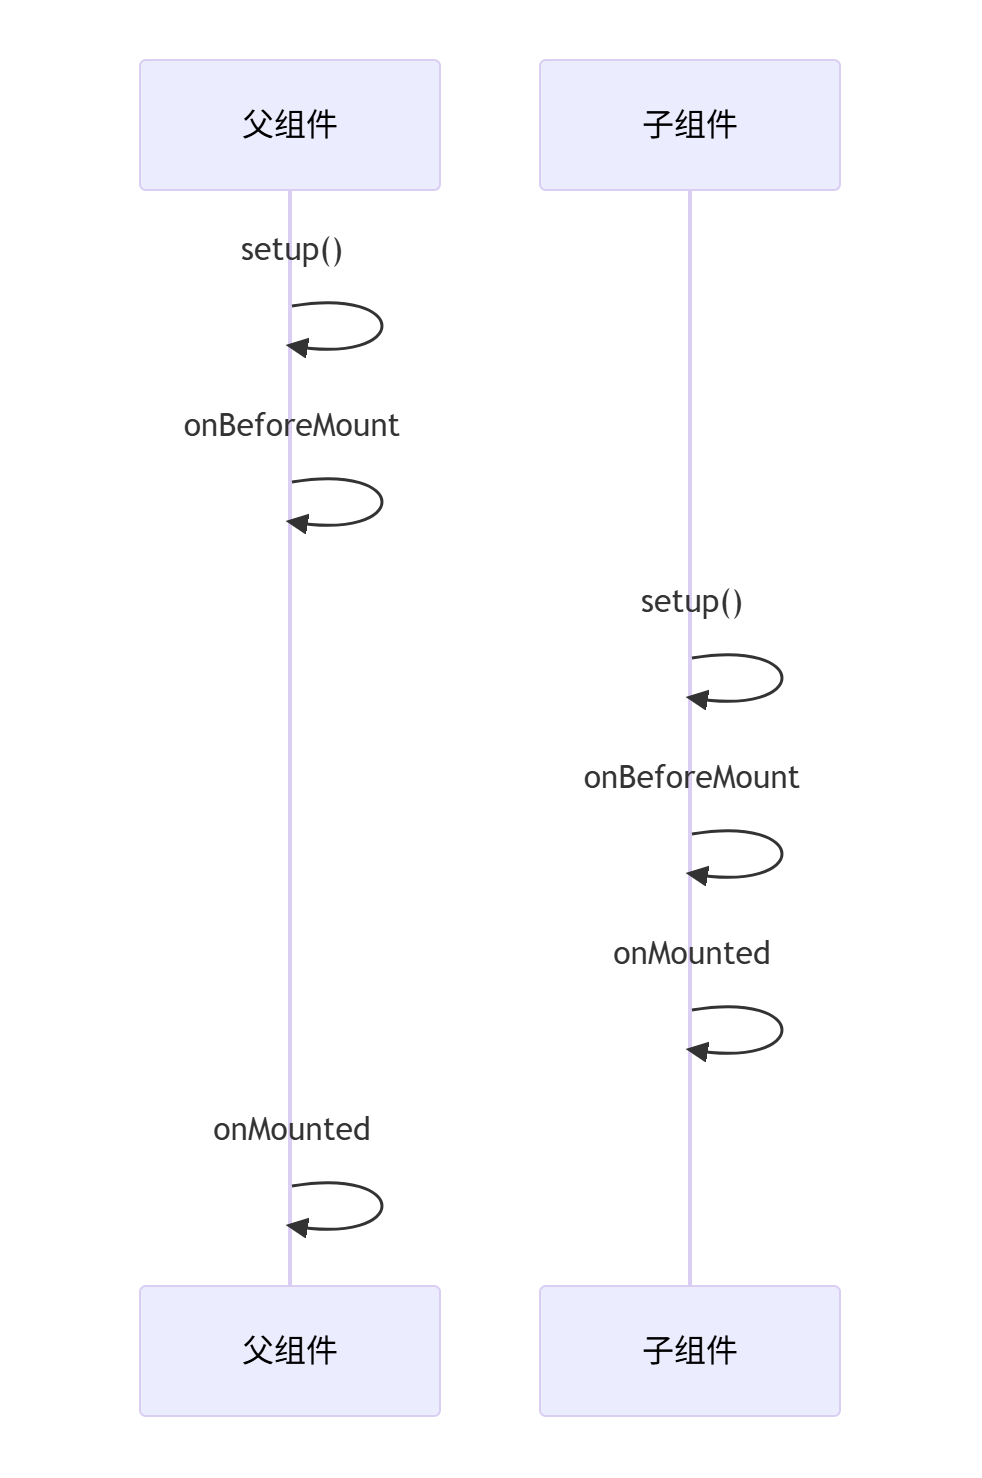
挂载阶段
父 beforeMount → 子 beforeMount → 子 mounted → 父 mounted
更新阶段
父 beforeUpdate → 子 beforeUpdate → 子 updated → 父 updated
卸载阶段
父 beforeUnmount → 子 beforeUnmount → 子 unmounted → 父 unmounted
setup 中的 相关疑问
1. 为什么在 setup 中访问不到 this?
setup() 在组件实例创建前执行,此时 this 尚未绑定。
2. 替代方案:如何访问组件实例?
通过 getCurrentInstance(谨慎使用)
import { getCurrentInstance } from 'vue'
export default {
  setup() {
    const instance = getCurrentInstance()
    // 访问根组件属性(类似 this.$root)
    console.log(instance.root.proxy)
    // 访问父组件(类似 this.$parent)
    console.log(instance.parent?.proxy)
    // 访问插槽(类似 this.$slots)
    console.log(instance.slots)
    return {}
  }
}
⚠️ 注意:
- 此 API 主要供库开发者使用,不推荐在业务代码中频繁使用
- 生产构建时可能被 Tree-Shaking(除屑优化) 移除
3. 哪些业务要setup访问类似this的功能?
| 业务场景 | 推荐解决方案 | 替代 this 的方式 |
|---|---|---|
| 访问全局属性 | 使用 provide/inject | inject('globalProperty') |
| 访问路由 | 使用 useRouter | const router = useRouter() |
| 访问 Vuex 存储 | 使用 useStore | const store = useStore() |
| 访问 $el | 使用模板 ref | const el = ref(null) |
| 访问 $parent | 通过 getCurrentInstance(谨慎) | getCurrentInstance().parent |
4. return 的作用
return 返回一个对象,这个对象的 所有属性和方法都会暴露给模板和其他组件选项(如 methods、computed 等)。
// 模板可访问, 可直接使用返回的 ref 和计算属性
<template>
  <div>{{ count }} × 2 = {{ double }}</div>
</template>

export default {
  setup() {
    const count = ref(0)
    const double = computed(() => count.value * 2)
    return {
      count,  // 模板中可直接使用 count
      double  // 模板中可直接使用 double
    }
  },
  methods: {
    printCount() {
      // 通过 this 访问 setup 返回的值
      console.log(this.count)
    }
  }
}
2.Vue2 组件只允许有一个根节点,Vue3允许有多个
// Vue2
<template>
    <div>
        <span></span>
        <span></span>
    </div>
</template>
// Vue3
<template>
    <span></span>
    <span></span>
</template>
- Vue2要求单根节点是因为其虚拟DOM实现依赖于每个组件实例必须对应一个单一的根DOM元素。组件的$el属性和diff算法都需要明确的根节点作为操作的锚点。
- Vue3允许多根节点是通过引入
Fragment(片段)的概念实现的。Fragment是一个特殊的虚拟节点,它本身不渲染为真实DOM,只是作为多个兄弟节点的逻辑容器。这使得Vue3的patch算法能够处理多根组件,同时为Teleport、Suspense等新特性奠定了基础。
3.响应式数据拦截监听方法比较(⭐️)
Vu2采用的是 Object.defineProperty, Vue3采用的是 Proxy
| 特性 | Vue2 | Vue3 |
|---|---|---|
| 底层技术 | Object.defineProperty | Proxy |
| 初始化时机 | 初始化时递归遍历所有属性 | 按需惰性响应式 |
| 数组处理 | 重写数组方法 | 原生支持数组操作 |
| 新增属性 | 需使用Vue.set | 自动支持 |
Object.defineProperty 虽然已经能够实现双向绑定了,但是他还是有缺陷的。
1、只能对属性进行数据劫持,所以需要深度遍历整个对象
2、对于数组不能监听到数据的变化
3、Proxy 的第二个参数可以有 13 种拦截方法,比 Object.defineProperty() 要更加丰富
4、Proxy 的兼容性不如 Object.defineProperty() 不能使用 polyfill 来处理兼容性
而Object.defineProperty这个对于数组缺陷可以通过vue提供的set方法去解决
Proxy能够原生支持监听数组变化,并且可以直接对整个对象进行拦截
4. Vue2 options Api 和 Vue3 conponents Api 对比(⭐️)
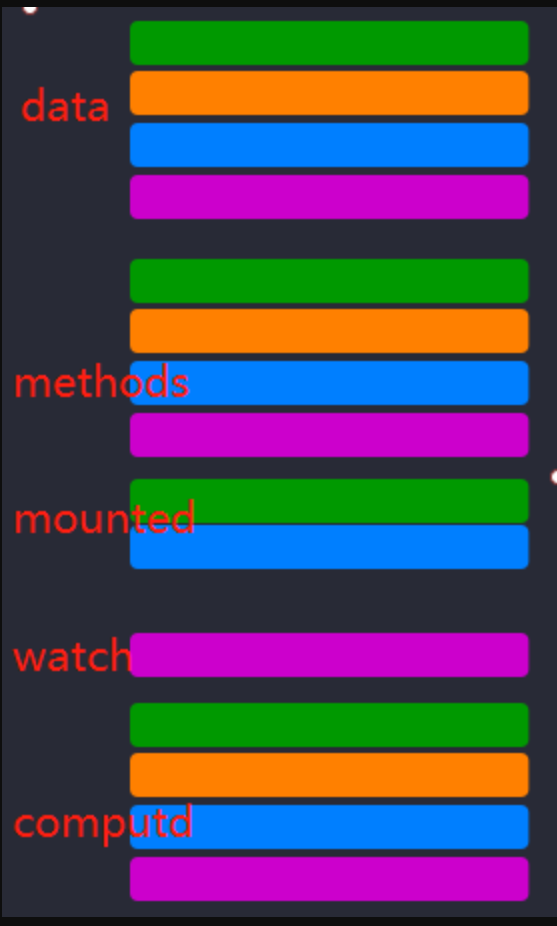
Options API 按选项类型组织代码(data、methods、computed分开),适合简单组件,但大型组件中相关逻辑分散,难以维护。逻辑复用依赖mixins,存在命名冲突和来源不清晰的问题。
Composition API 按逻辑功能组织代码,将相关的数据、计算属性、方法放在一起,类似React Hooks。它通过自定义Hook实现更好的逻辑复用,有更好的TypeScript支持,更适合大型复杂应用。
实际选择时,小型简单组件用Options API更直观,大型复杂组件用Composition API更易维护。Vue 3两者都支持,可以根据项目需求灵活选择
Vue2 options Api示例图
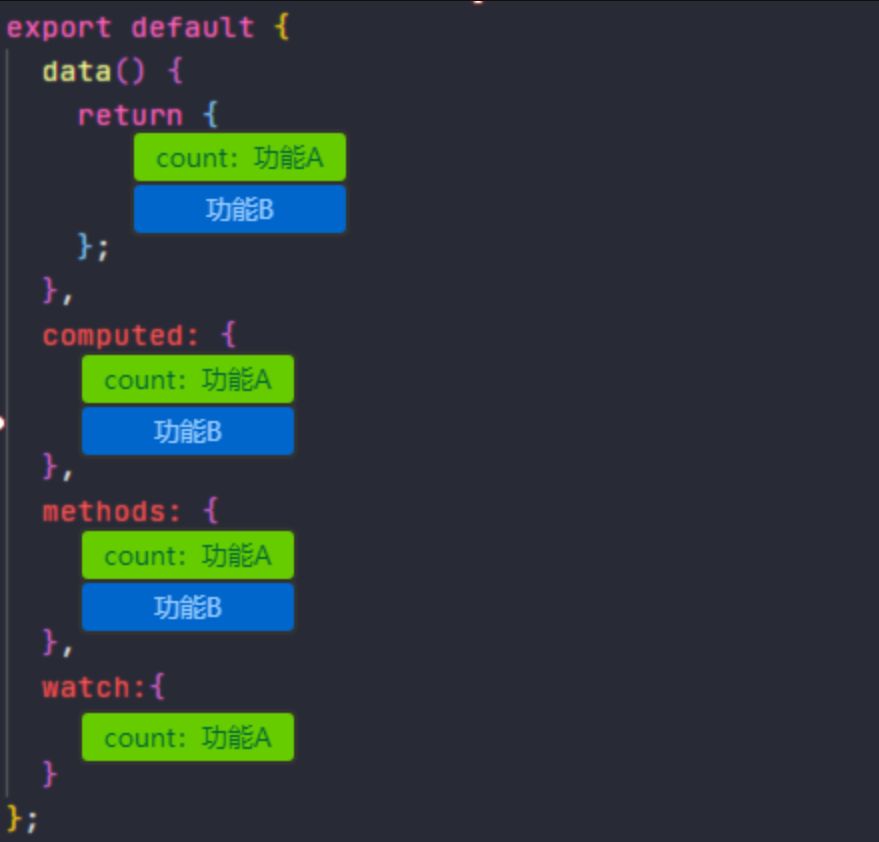
- 通过选项(data, methods, computed 等)组织代码:
export default {
  data() { /* ... */ },
  methods: { /* ... */ },
  computed: { /* ... */ }
};
Vue3 conponents Api
- 通过 setup() 函数按逻辑组织代码(类似 React Hooks):
import { ref, computed } from 'vue';

export default {
  setup() {
    const count = ref(0);
    const double = computed(() => count.value * 2);
    return { count, double };
  }
};
当这个组件的代码超过几百行时,这时增加或者修改某个需求, 就要在 data、methods、computed 以及 mounted 中反复的跳转,这其中的的痛苦写过的都知道。
vue2.x 版本给出的解决方案就是 Mixin,但是也会有相对应的问题
1、命名冲突问题
2、不清楚暴露出来的变量的作用
3、逻辑重用到其他 component 经常遇到问题
Vue 3: 自定义Hook(清晰复用)
// useUser.js - 自定义Hook
import { ref, onMounted } from 'vue'
export function useUser() {
  const users = ref([])
  const isLoading = ref(false)
  async function fetchUsers() {
    // 获取用户数据
  }
  onMounted(fetchUsers)
  return {
    users,
    isLoading,
    fetchUsers
  }
}

// component.vue
import { useUser } from './useUser'

const { users, isLoading, fetchUsers } = useUser()
// ✅ 清晰:明确知道user来自useUser
// ✅ 类型安全:TypeScript友好
// ✅ 可组合:可以和其他Hook组合使用
Composition的核心优势
1、更强的逻辑复用能力
通过自定义组合式函数,可以将业务逻辑干净利落地封装成独立、可测试的单元,然后在多个组件中像普通函数一样引入和使用,彻底解决了 Mixin 的痛点
// 1. 封装逻辑:useMouse.js
import { ref, onMounted, onUnmounted } from 'vue';
export function useMouse() {
  const x = ref(0);
  const y = ref(0);
  // 相关逻辑可以集中在此处
  const update = (e) => {
    x.value = e.pageX;
    y.value = e.pageY;
  };
  onMounted(() => window.addEventListener('mousemove', update));
  onUnmounted(() => window.removeEventListener('mousemove', update));
  // 返回需要使用的数据和方法
  return { x, y };
}

// 2. 在组件中使用
import { useMouse } from './useMouse';
setup() {
  const { x, y } = useMouse(); // 逻辑清晰复用
  return { x, y };
}
2、更优雅的代码组织
当组件变得复杂时,Options API 会导致开发者在 data, methods, computed, mounted等选项间反复跳跃查看和修改同一功能的代码。Composition API 允许你将一个功能的所有代码(数据、计算属性、方法、生命周期钩子)组织在同一个区域,大大提升了代码的可读性和可维护性。
3、更出色的 TypeScript 集成
由于 Composition API 主要使用普通的变量和函数,它能够与 TypeScript 的静态类型系统完美协作,提供更可靠的类型推断和代码提示,非常适合大型项目开发
5.watch 和 watchEffect 区别(⭐️)
| 特性 | watch | watchEffect |
|---|---|---|
| 依赖收集方式 | 显式指定侦听源 | 隐式自动收集 |
| 初始执行 | 默认不执行(可配置) | 立即执行 |
| 回调参数 | 提供新旧值 | 无参数 |
| 停止侦听 | 返回停止函数 | 返回停止函数 |
(1) 用法示例
const count = ref(0);
const name = ref('爱丽丝');
const user = reactive({
  id: 1,
  details: {
    name: '鲍勃',
    age: 30,
  },
});

// --- watchEffect ---
// 1. 在组件初始化时立即执行。
// 2. 自动追踪其依赖项。
//    每当 'count.value' 或 'name.value' 发生变化时,它会重新运行。
watchEffect(() => {
  console.log(`watchEffect: Count 是 ${count.value}, Name 是 ${name.value}。此 effect 执行。`);
}, { flush: 'post' });

// 1. 侦听单个 ref
//    - 默认情况下不会立即执行。
//    - 提供 oldValue 和 newValue。
watch(count, (newValue, oldValue) => {
  console.log(`watch (count): 从 ${oldValue} 变为 ${newValue}。`);
});

// 2. 侦听一个 getter 函数
//    - 用于侦听响应式对象的特定属性。
watch(() => user.id, (newId, oldId) => {
  console.log(`watch (user.id getter): User ID 从 ${oldId} 变为 ${newId}。`);
});


// 3. 侦听多个源
//    - 回调函数接收新值和旧值的数组。
watch([count, name], ([newCount, newName], [oldCount, oldName]) => {
  console.log(`watch (多个源: [count, name]): Count: ${oldCount} -> ${newCount}, Name: ${oldName} -> ${newName}。`);
});

// 4. 使用 `immediate: true` 的 watch
//    - 在初始化时立即执行回调,此时 oldValue 为 undefined。
watch(name, (newName, oldName) => {
  console.log(`watch (name, immediate): Name: ${oldName === undefined ? 'N/A (初始运行)' : oldName} -> ${newName}。`);
}, { immediate: true });

// 5. 侦听响应式对象 (直接属性更改)
//    - 默认情况下,对响应式对象的 `watch` 对于其直接属性是"深层"的。
//    - 但是,除非指定了 `deep: true` 或您侦听特定的嵌套属性,否则它不会因嵌套对象更改而触发。
//    - 直接侦听响应式对象时,除非对象引用本身被替换,否则 oldValue 和 newValue 将是同一个对象
//      (代理到同一个底层对象)。
watch(user, (newUser, oldUser) => {
  // 注意:对于响应式对象,如果您直接修改属性,newUser 和 oldUser 通常是同一个代理对象。
  // 变化发生在对象 *内部*。
  // 如果 `user.id` 更改,或者 `user.details` 被替换,则此侦听器会触发。
  // 在没有 `deep:true` 的情况下,它不会因为 `user.details.name` 的更改而触发。
  console.log(`watch (user 对象直接侦听): User 对象已更改。New ID: ${newUser.id}, Old ID (可能是相同的代理): ${oldUser.id}。`);
  if (newUser === oldUser) {
    console.log('watch (user 对象直接侦听): newUser 和 oldUser 是同一个代理对象。');
  }
});

// 6. 深层侦听响应式对象
//    - 使用 `deep: true` 来侦听对象内部任何级别的更改。
//    - 对于非常大或复杂的对象,请注意性能。
watch(user, (newUser, oldUser) => {
  console.log(`watch (user 对象, deep: true): User 详细信息已更改。New Name: ${newUser.details.name}, Age: ${newUser.details.age}。`);
  // 即使使用 deep,如果对象被修改,newUser 和 oldUser 也可能是同一个代理。
  // 关键是 *内部的某些东西* 发生了变化。
}, { deep: true });
(2) 停止侦听
// watch
const stopWatch = watch(/* ... */)
stopWatch()

// watchEffect
const stopEffect = watchEffect(/* ... */)
stopEffect()
(3) 副作用清理
// watch
watch(source, (newVal, oldVal, onCleanup) => {
  const timer = setTimeout(() => {}, 1000)
  onCleanup(() => clearTimeout(timer))
})

// watchEffect
watchEffect((onCleanup) => {
  const timer = setTimeout(() => {}, 1000)
  onCleanup(() => clearTimeout(timer))
})
使用 watch 当:
✅ 需要比较新旧值
✅ 需要惰性执行(非立即执行)
✅ 侦听特定数据源,避免不必要的触发
✅ 侦听嵌套数据结构中的特定属性
使用 watchEffect 当:
✅ 需要立即执行并建立依赖关系
✅ 依赖多个属性且关系复杂
✅ 执行副作用不关心具体变化值
flush 的可选值
控制副作用执行时机的重要配置选项,主要用于 watch 和 watchEffect
| 值 | 执行时机 | 适用场景 |
|---|---|---|
'pre' | 组件更新前(默认值) | 需要获取更新前DOM状态时 |
'post' | 组件更新后 | 需要操作更新后的DOM时 |
'sync' | 依赖变更后同步立即执行 | 需要极速响应的特殊场景 |
不同 flush 模式的执行流程对比
1. 依赖变更触发流程:
'sync': 变更 → 立即执行副作用
'pre': 变更 → 加入pre队列 → 组件beforeUpdate → 执行pre队列 → DOM更新
'post': 变更 → 加入post队列 → 组件beforeUpdate → DOM更新 → 执行post队列
2. 与生命周期钩子的关系:
beforeUpdate → ('pre'副作用) → DOM更新 → updated → ('post'副作用)
不同场景下的选择指南
| 场景特征 | 推荐值 | 理由 |
|---|---|---|
| 需要获取元素更新前尺寸 | 'pre' | 在DOM更新前捕获旧值 |
| 触发需要DOM更新的动画 | 'post' | 确保动画基于最新DOM状态 |
| 实时游戏状态同步 | 'sync' | 需要帧级精确响应 |
| 表单输入验证 | 'pre' | 在用户看到变化前完成验证 |
| 图表数据更新 | 'post' | 确保容器尺寸已更新 |
| 与Web Worker通信 | 'sync' | 避免消息延迟 |
6.组件通信方式(⭐️)
一、父子组件通信
1. Props / $emit(Vue2 & Vue3 通用)
- 父 → 子:通过 props 传递数据
- 子 → 父:通过 $emit 触发事件
Vue2 父子组件通信
<!-- Parent.vue -->
<!-- 父组件 → 子组件(props) -->
<template>
  <div>
    <Child :message="parentMsg" @update="handleUpdate" />
  </div>
</template>

<script>
import Child from './Child.vue';
export default {
  components: { Child },
  data() {
    return { parentMsg: 'Hello from Parent' };
  },
  methods: {
    handleUpdate(newMsg) {
      this.parentMsg = newMsg; // 接收子组件传递的数据
    }
  }
};
</script>
<!-- 子组件 → 父组件($emit) -->
<!-- Child.vue -->
<template>
  <div>
    <p>收到父组件消息:{{ message }}</p>
    <button @click="sendToParent">点击修改父组件数据</button>
  </div>
</template>

<script>
export default {
  props: ['message'], // 接收父组件数据
  methods: {
    sendToParent() {
      this.$emit('update', '子组件修改后的消息'); // 触发父组件事件
    }
  }
};
</script>
Vue3 父子组件通信(Composition API)
<!-- Parent.vue -->
<!-- 父组件 → 子组件(props) -->
<template>
  <Child :message="parentMsg" @update="handleUpdate" />
</template>

<script setup>
import { ref } from 'vue';
import Child from './Child.vue';

const parentMsg = ref('Hello from Parent');
const handleUpdate = (newMsg) => {
  parentMsg.value = newMsg;
};
</script>
<!-- Child.vue -->
<!-- 子组件 → 父组件(defineEmits) -->
<template>
  <div>
    <p>收到父组件消息:{{ message }}</p>
    <button @click="sendToParent">点击修改父组件数据</button>
  </div>
</template>

<script setup>
defineProps(['message']); // 接收props
const emit = defineEmits(['update']); // 声明事件
const sendToParent = () => {
  emit('update', '子组件修改后的消息'); // 触发事件
};
</script>
2. v-model / .sync(语法糖),适用于表单组件
- Vue2:
.sync修饰符(双向绑定) - Vue3:
v-model可绑定多个值
Vue2 的 .sync 修饰符
<!-- Parent.vue -->
<!-- Vue2 的 .sync 修饰符 -->
<template>
  <div>
    <Child :title.sync="parentTitle" />
    <p>父组件标题:{{ parentTitle }}</p>
  </div>
</template>

<script>
import Child from './Child.vue';
export default {
  components: { Child },
  data() {
    return {
      parentTitle: '默认标题'
    };
  }
};
</script>
<!-- Child.vue -->
<template>
  <div>
    <input
      :value="title"
      @input="$emit('update:title', $event.target.value)"
    />
  </div>
</template>

<script>
export default {
  props: ['title'] // 接收父组件传递的 title
};
</script>
- 关键点:
.sync本质是:title+@update:title的语法糖- 子组件通过
$emit('update:propName')修改父组件数据
为什么会有“只能绑定一个属性”的说法?
- 历史背景
- Vue2 早期版本中,
.sync曾被废弃(因滥用导致数据流混乱),后来在 2.3.0+ 重新引入但官方文档强调谨慎使用 - 开发者为避免滥用,常约定“尽量不用
.sync”或“只用于单个属性”,导致误解传播
- Vue2 早期版本中,
Vue3 的 v-model(支持多个绑定)
<!-- Parent.vue -->
<template>
  <Child v-model:title="parentTitle" v-model:content="parentContent" />
</template>

<script setup>
import { ref } from 'vue';
import Child from './Child.vue';
const parentTitle = ref('默认标题');
const parentContent = ref('默认内容');
</script>
<!-- Child.vue -->
<template>
  <div>
    <input
      :value="title"
      @input="$emit('update:title', $event.target.value)"
    />
    <textarea
      :value="content"
      @input="$emit('update:content', $event.target.value)"
    />
  </div>
</template>

<script setup>
defineProps(['title', 'content']);
defineEmits(['update:title', 'update:content']);
</script>
- 关键点:
- Vue3 的
v-model:propName可绑定多个属性 - 子组件需通过
defineEmits显式声明更新事件
- Vue3 的
提示
Vue3 的 v-model 本质是 modelValue + update:modelValue 的语法糖,且支持多个绑定"
二、跨层级通信
3. provide / inject(Vue2.2+ & Vue3),适用于主题/配置
- 祖先组件:
provide提供数据 - 后代组件:
inject注入数据
// 祖先组件
export default {
  provide() {
    return { theme: 'dark' };
  }
}

// 后代组件
export default {
  inject: ['theme']
}
- 适用场景:
- 主题切换、全局配置等跨多级组件传递
4. attrs/listeners(Vue2)→ useAttrs(Vue3)
- Vue2:
- $attrs:接收非 props 的属性
- $listeners:接收所有事件
- Vue3:
- 合并为 useAttrs(),用于获取组件接收的所有非props属性,包括class、style、事件监听器等。
Vue2 的 $attrs 和 $listeners
<!-- 父组件(传递属性和事件) -->
<!-- Parent.vue -->
<template>
  <Child
    title="父组件标题"
    class="red-text"
    @click="handleClick"
    @custom-event="handleCustom"
  />
</template>

<script>
import Child from './Child.vue';
export default {
  components: { Child },
  methods: {
    handleClick() {
      console.log('点击事件触发');
    },
    handleCustom() {
      console.log('自定义事件触发');
    }
  }
};
</script>
<!-- 子组件(透传到孙组件) -->
<!-- Child.vue -->
<template>
  <!-- 透传所有非props属性和事件 -->
  <GrandChild v-bind="$attrs" v-on="$listeners" />
</template>

<script>
import GrandChild from './GrandChild.vue';
export default {
  components: { GrandChild },
  inheritAttrs: false, // 禁止自动绑定到根元素
  props: ['title'], // 显式接收的prop不会出现在$attrs中
  created() {
    console.log(this.$attrs); // 输出:{ class: "red-text" }
    console.log(this.$listeners); // 输出:{ click: fn, custom-event: fn }
  }
};
</script>
<!-- 孙组件(最终接收) -->
<!-- GrandChild.vue -->
<template>
  <button @click="$emit('click')">
    点击我(透传的class:{{ $attrs.class }})
  </button>
</template>
Vue3 的 useAttrs(合并了属性和事件)
<!-- 父组件(传递属性和事件) -->
<!-- Parent.vue -->
<template>
  <Child
    title="父组件标题"
    class="red-text"
    @click="handleClick"
  />
</template>

<script setup>
import { ref } from 'vue';
import Child from './Child.vue';
const handleClick = () => {
  console.log('点击事件触发');
};
</script>
<!-- 子组件(透传属性) -->
<!-- Child.vue -->
<template>
  <GrandChild v-bind="attrs" />
</template>

<script setup>
import { useAttrs } from 'vue';
import GrandChild from './GrandChild.vue';
const attrs = useAttrs(); // 自动合并属性和事件
console.log(attrs); // 输出:{ class: "red-text", onClick: fn }
</script>
<!-- 孙组件(最终接收) -->
<!-- GrandChild.vue -->
<template>
  <button @click="attrs.onClick">
    点击我(透传的class:{{ attrs.class }})
  </button>
</template>
<script setup>
import { useAttrs } from 'vue';
const attrs = useAttrs();
</script>
- 记忆技巧:
"attrs传属性,listeners传事件,Vue3 合并简化"
三、全局状态管理
5. Vuex(Vue2)→ Pinia(Vue3 推荐)
| 特性 | Vuex | Pinia |
|---|---|---|
| API 设计 | state + mutations + actions | 合并为 state + actions |
| TypeScript | 支持较弱 | 原生支持类型推断 |
| 模块化 | 通过 modules 分割 | 每个Store是独立文件 |
| 异步处理 | 需在 actions 中调用 commit | 可直接修改 state |
| modules | 独立store文件 | 无需命名空间 |
- Vuex:
- state / mutations / actions / getters
// 定义 Store (store/index.js)
import Vue from 'vue';
import Vuex from 'vuex';
Vue.use(Vuex);
export default new Vuex.Store({
  state: {
    count: 0,
    user: null
  },
  mutations: {
    SET_COUNT(state, payload) {
      state.count = payload;
    },
    SET_USER(state, payload) {
      state.user = payload;
    }
  },
  actions: {
    async fetchUser({ commit }, userId) {
      const user = await api.getUser(userId); // 模拟API请求
      commit('SET_USER', user);
    }
  },
  getters: {
    doubleCount: state => state.count * 2
  }
});
<!-- 组件中使用 (MyComponent.vue) -->
<template>
  <div>
    <p>Count: {{ $store.state.count }}</p>
    <p>Double: {{ $store.getters.doubleCount }}</p>
    <button @click="$store.commit('SET_COUNT', 10)">直接修改</button>
    <button @click="$store.dispatch('fetchUser', 123)">异步获取用户</button>
  </div>
</template>

<script>
export default {
  computed: {
    user() {
      return this.$store.state.user;
    }
  }
};
</script>
- Pinia:
- 更简洁的 API(defineStore)
- 支持 Composition API
// 定义 Store (stores/counterStore.js)
import { defineStore } from 'pinia';
export const useCounterStore = defineStore('counter', {
  state: () => ({
    count: 0,
    user: null
  }),
  actions: {
    setCount(payload) {
      this.count = payload; // 直接修改(无需mutations)
    },
    async fetchUser(userId) {
      this.user = await api.getUser(userId); // 直接赋值
    }
  },
  getters: {
    doubleCount: state => state.count * 2
  }
});
<!-- 组件中使用 (MyComponent.vue) -->
<template>
  <div>
    <p>Count: {{ counter.count }}</p>
    <p>Double: {{ counter.doubleCount }}</p>
    <button @click="counter.setCount(10)">直接修改</button>
    <button @click="counter.fetchUser(123)">异步获取用户</button>
  </div>
</template>

<script setup>
import { useCounterStore } from '@/stores/counterStore';
const counter = useCounterStore();
</script>
Pinia 是 Vue3 官方推荐的状态管理工具,去除了 mutations,直接支持异步操作
四、其他通信方式
6. Event Bus(Vue2)→ mitt(Vue3 替代),适用于通知消息
- Vue2:通过
new Vue()实例实现 - Vue3:推荐使用第三方库
mitt
// Vue2 的 Event Bus
const bus = new Vue();
bus.$on('event', () => {});
bus.$emit('event');

// Vue3 使用 mitt
import mitt from 'mitt';
const emitter = mitt();
emitter.on('event', () => {});
emitter.emit('event');
使用场景:简单场景的跨组件通信,但大型项目建议用 Pinia/Vuex
7. Ref 获取组件实例(Vue2 & Vue3),父组件调用子组件方法
| 特性 | Vue2 | Vue23 |
|---|---|---|
| API | this.$refs.xxx | const xx = ref(null) + xx.value |
| 暴露控制 | 默认暴露所有选项(data/methods) | 需手动 defineExpose 暴露特定内容 |
| Composition | 无 | 支持在 <script setup> 中使用 |
Vue2 的 $refs 获取组件实例
<!-- 父组件(通过 ref 标记子组件) -->
<!-- Parent.vue -->
<template>
  <div>
    <Child ref="childRef" />
    <button @click="callChildMethod">调用子组件方法</button>
  </div>
</template>

<script>
import Child from './Child.vue';
export default {
  components: { Child },
  methods: {
    callChildMethod() {
      // 通过 $refs 获取子组件实例
      this.$refs.childRef.sayHello(); // 调用子组件方法
      console.log(this.$refs.childRef.message); // 访问子组件数据
    }
  }
};
</script>
<!-- 子组件(默认暴露所有选项) -->
<!-- Child.vue -->
<template>
  <div>子组件</div>
</template>

<script>
export default {
  data() {
    return {
      message: 'Hello from Child'
    };
  },
  methods: {
    sayHello() {
      alert('子组件方法被调用!');
    }
  }
};
</script>
Vue3 的 ref + defineExpose
<!-- 父组件(使用 ref 绑定) -->
<!-- Parent.vue -->
<template>
  <Child ref="childRef" />
  <button @click="callChildMethod">调用子组件方法</button>
</template>

<script setup>
import { ref } from 'vue';
import Child from './Child.vue';
const childRef = ref(null); // 创建 ref 引用
const callChildMethod = () => {
  // 通过 .value 访问子组件实例
  childRef.value?.sayHello(); // 安全调用(可选链)
  console.log(childRef.value?.message);
};
</script>
<!-- 子组件(需显式暴露内容) -->
<!-- Child.vue -->
<template>
  <div>子组件</div>
</template>

<script setup>
import { ref, defineExpose } from 'vue';
const message = ref('Hello from Child');
const sayHello = () => {
  alert('子组件方法被调用!');
};
// 必须显式暴露,父组件才能访问
defineExpose({
  message,
  sayHello
});
</script>
7.Vue3 Diff算法和 Vue2 的区别(⭐️)
编译阶段的优化:
1、事件缓存:将事件缓存(如: @click),可以理解为变成静态的了
2、静态提升:第一次创建静态节点时保存,后续直接复用
3、添加静态标记:给节点添加静态标记,以优化 Diff 过程
由于编译阶段的优化,除了能更快的生成虚拟 DOM 以外,还使得 Diff 时可以跳过"永远不会变化的节点",Diff 优化如下:
Vue2 是全量 Diff。
Vue3 是静态标记 + 非全量 Diff, 使用最长递增子序列优化了对比流程。
| 对比项 | Vue 2 | Vue 3 |
|---|---|---|
| Diff 策略 | 双端交叉比较(头尾指针) | 快速 Diff + 最长递增子序列(LIS) |
| 静态优化 | 无 | Patch Flag 标记静态节点 |
| 复用机制 | 依赖 key 的全量比较 | 使用 Rollup 进行生产打包 |
| 移动次数 | 可能较多 | 最小化(LIS 优化) |
| 性能 | 较慢 | 更快(2~5 倍优化) |
8. Vue3 router
| 特性 | Vue 2 (vue-router 3.x) | Vue 3 (vue-router 4.x) |
|---|---|---|
| 兼容性 | 仅支持 Vue 2 | 仅支持 Vue 3 |
| 创建方式 | new Router() | createRouter() |
| 路由模式 | mode: 'history' | history: createWebHistory() |
| 动态路由 | router.addRoutes() | router.addRoute() |
1. 具体差异解析
- 初始化方式变化
// Vue 2 (vue-router 3.x)
import Router from 'vue-router';
const router = new Router({
  mode: 'history',
  routes: [...]
});

// Vue 3 (vue-router 4.x)
import { createRouter, createWebHistory } from 'vue-router';
const router = createRouter({
  history: createWebHistory(), // 或 createWebHashHistory()
  routes: [...]
});
- 路由模式配置
- Vue 2:通过 mode 指定
mode: 'history' // 或 'hash'、'abstract'
- Vue 3:使用独立函数
import { createWebHistory, createWebHashHistory } from 'vue-router';
history: createWebHistory()  // 或 createWebHashHistory()
- 动态路由 API
// Vue 2
router.addRoutes([...routes]);

// Vue 3 (更灵活)
router.addRoute(parentName, route); // 添加嵌套路由
router.removeRoute('route-name');   // 删除路由
- 路由守卫组合式 API
// Vue 3 新增组合式守卫
import { onBeforeRouteLeave, onBeforeRouteUpdate } from 'vue-router';

setup() {
  onBeforeRouteLeave((to, from) => {
    return confirm('确定离开吗?');
  });
}
-
<router-view>用法升级
-
<!-- Vue 2 -->
<router-view></router-view>

<!-- Vue 3 支持 v-slot 控制缓存 -->
<router-view v-slot="{ Component }">
  <keep-alive>
    <component :is="Component" />
  </keep-alive>
</router-view>
2. 新增特性(Vue 3 专属)
- 路由懒加载改进
// Vue 3 推荐使用 defineAsyncComponent
const User = () => import('./User.vue');
// 或
const User = defineAsyncComponent(() => import('./User.vue'));
- 路由元数据 (meta) 类型化
declare module 'vue-router' {
  interface RouteMeta {
    requiresAuth: boolean;
  }
}
常见问题
Q1: Vue 3 的 vue-router 为什么改用 createRouter?
答:
- 保持与 Vue 3 的 Composition API 设计一致(工厂函数模式)。
- 明确分离路由模式(createWebHistory vs createWebHashHistory)。
Q2: Vue 3 中如何实现路由守卫?
答:
- 选项式 API:仍支持 beforeRouteEnter 等组件内守卫。
- 组合式 API:使用 onBeforeRouteUpdate 等函数。
Q3: Vue 3 的动态路由有什么优化?
答:
- 支持单个路由的增删(addRoute/removeRoute)。
- 优先级规则更符合直觉(后添加的路由优先匹配)
9.获取数据生命周期对比
Vue 2 (Options API)
- 在获取数据后,对数据的处理如果不涉及DOM,可在
created阶段获取,毕竟速度更快一些 - 如果数据涉及到DOM的处理,则要在
mounted阶段获取数据
created() {
  // 常见的数据获取位置(不依赖 DOM)
  fetch('https://api.example.com/posts')
}
Vue 3 (Composition API)
- setup() 函数内部(相当于 created 阶段)
setup() 是组合式 API 的入口,在组件创建时同步执行(早于 beforeMount 和 mounted)。
这是推荐的数据获取位置,类似于 Vue 2 的 created。
- onMounted(如果需要依赖 DOM)
通过 onMounted 钩子可以在 DOM 挂载后执行操作,类似于 Vue 2 的 mounted。
 setup() {
    // 推荐:在 setup 中直接获取数据(类似 created)
    fetch('https://api.example.com/posts')

    // 如果需要 DOM,使用 onMounted
    onMounted(() => {
      console.log('DOM 已挂载');
    });
  }
10.数据定义对比⭐️
Vue 2
data 必须是一个函数,返回一个对象: 所有响应式数据需在 data 函数中定义,Vue 会自动将其转换为响应式对象(基于 Object.defineProperty)。
export default {
  data() {
    return {
      count: 0,
      message: "Hello Vue2"
    };
  }
};
模板中使用,直接通过 this.count 访问。
Vue 3
| API | 适用类型 | 访问方式 | 解构响应性 | 典型场景 |
|---|---|---|---|---|
| ref | 基本类型/对象 | .value | 原生支持 | 单个值、模板暴露、DOM 引用 |
| reactive | 对象/数组 | 直接访问属性 | 需 toRefs | 复杂状态对象、表单数据 |
| toRefs | reactive 对象 | .value | 原生支持 | 解构 reactive 返回值 |
一、ref:处理基本类型(也可用于对象)
- 核心特点
- 包装基本类型:通过 .value 访问/修改值
- 深层响应式:如果传入对象,内部会调用 reactive 实现深层响应
- 模板自动解包:在模板中无需写 .value
import { ref } from 'vue';

// 基本类型
const count = ref(0);
console.log(count.value); // 0
count.value++; // 修改值

// 对象类型(也可用,但更推荐 reactive)
const obj = ref({ a: 1 });
obj.value.a = 2; // 自动深层响应
为什么需要
.value?- 由于原始类型不能直接被 Proxy 代理(Proxy 只能作用于对象),Vue 设计了
ref来处理原始类型的响应式,通过.value属性访问其封装的值。 ref的内部本质上是一个对象,只有一个.value属性存储真正的值。对.value的访问和修改操作,都会被Vue内部的响应式系统捕捉,从而实现响应式更新。
- 由于原始类型不能直接被 Proxy 代理(Proxy 只能作用于对象),Vue 设计了
为什么不直接用 ref 本身来存取值?
- 使用
.value而不直接使用ref本身访问值,主要是为了区分响应式的引用和非响应式的普通变量。 - 如果直接使用
ref本身访问值,而不通过.value,Vue 无法清楚地区分什么时候应该进行响应式追踪和触发更新。
- 使用
二、reactive:处理对象/数组
核心特点
- 直接代理对象:返回的对象本身就是响应式的
- 无需
.value:直接访问属性即可 - 深层响应:嵌套对象也会被自动代理
重要限制
- 不能直接解构:解构后会丢失响应性
// ❌ 错误做法:解构后失去响应性
const { count } = state;
count++; // 不会触发视图更新
三、toRefs:保持响应式的解构
- 解决
reactive解构问题- 转换对象属性为
ref:每个属性都变成独立的ref - 保持响应性链接:修改解构后的值仍能触发更新
- 转换对象属性为
import { reactive, toRefs } from 'vue';

const state = reactive({ count: 0, name: 'Alice' });
const { count, name } = toRefs(state); // 解构为 ref

count.value++; // 通过 .value 修改
console.log(state.count); // 1 (原对象同步更新)
toRef和toRefs的基本区别:toRef:为响应式对象的单个属性创建ref,保持与源属性的响应式连接toRefs:将响应式对象的所有属性都转换为ref,返回一个普通对象,每个属性都是ref
11.全局 API 变化
1. 创建应用实例
Vue 2: 全局 API 挂载在 Vue 构造函数上(如 Vue.component, Vue.directive)。
Vue 3: 使用 createApp 创建实例,全局 API 通过实例调用:
// Vue 2
import Vue from 'vue';
new Vue({ el: '#app', render: h => h(App) });

// Vue 3
import { createApp } from 'vue';
createApp(App).mount('#app');
2. 全局配置
// Vue 2
Vue.config.productionTip = false; // 关闭生产提示
Vue.config.ignoredElements = ['custom-el']; // 忽略自定义元素

// Vue 3
const app = createApp(App);
app.config.errorHandler = (err) => { /* 错误处理 */ };
app.config.isCustomElement = tag => tag.startsWith('ion-'); // 自定义元素检查
Vue 3 的配置仅对当前应用实例生效,避免全局副作用。
3. 全局 API 模块化
| Vue 2 | Vue 3(需显式导入) | 作用 |
|---|---|---|
Vue.nextTick | import { nextTick } from 'vue' | DOM 更新后执行回调 |
Vue.set / Vue.delete | 已废弃(Proxy 自动支持) | 响应式添加/删除属性(Vue 2 专用) |
Vue.directive | app.directive('focus', {...}) | 注册全局指令 |
Vue.filter | 已移除(推荐用计算属性替代) | 全局过滤器 |
12.新增Teleport(传送门)⭐️
Vue 3 新增 Teleport:可以将组件渲染到 DOM 的任意位置(如全局弹窗):
<template>
  <Teleport to="body">
    <div class="modal">内容</div>
  </Teleport>
</template>
在这个例子中,<Teleport> 组件会将内部的 <div class="modal"> 渲染到 <body> 标签中,而不是在当前组件的 DOM 结构中。
- 使用场景
- 模态框(Modal)
- 通知(Notification)
- 全局工具提示(Tooltip)
- 浮动菜单或弹窗(Dropdown)
to 属性
to 属性指定了 Teleport 内容的目标位置。它可以是一个 CSS 选择器字符串,也可以是一个 DOM 元素。
<teleport to="#app">
  <div>内容将被渲染到 #app 元素中</div>
</teleport>
多个 Teleport 到同一个目标
如果多个 Teleport 组件指向同一个目标位置,它们的内容会按照在 DOM 中的顺序依次渲染。
<template>
  <div>
    <teleport to="#target">
      <div>第一个内容</div>
    </teleport>
    <teleport to="#target">
      <div>第二个内容</div>
    </teleport>
  </div>
</template>
限制与注意事项
- 状态依然在父组件
- 虽然 DOM 渲染位置发生了变化,但组件的状态、事件等逻辑仍然属于父组件。
- 父组件销毁时,Teleport 的内容也会被销毁。
- 动态目标
目标容器可以是动态创建的,但需要确保容器在 Teleport 渲染之前存在。
- 与 CSS 的交互
Teleport 的内容脱离了父组件的 DOM 层级,因此需要确保样式在目标容器中也适用。例如,全局样式表需要覆盖 Teleport 渲染的内容。
13.新增defineAsyncComponent⭐️
defineAsyncComponent是Vue3提供的一个API,用于延迟加载组件。它返回一个包装组件,只有当组件需要渲染时才会真正加载。
- 有两种使用方式:
- 工厂函数形式:
defineAsyncComponent(() => import('./Comp.vue')) - 配置对象形式:可配置加载状态、错误处理、延迟、超时等
- 工厂函数形式:
工厂函数形式
// 使用import()动态导入
import { defineAsyncComponent } from 'vue'

// 1. 工厂函数方式(最简单)
const AsyncComp = defineAsyncComponent(() =>
  import('./MyComponent.vue')
)
- 主要应用场景包括:
- 路由懒加载:减少初始包体积
- 大组件延迟加载:提升首屏速度
- 条件渲染组件:只在需要时加载
- 组件库按需引入:减少打包体积
14.新增Suspense⭐️
Suspense是Vue3新增的内置组件,用于优雅地处理异步组件和异步数据的加载状态。它的核心价值在于提升用户体验,避免页面闪烁和空白
基本语法
<Suspense>
  <!-- 包含异步组件的插槽 -->
  <template #default>
    <!-- 放置一个或多个异步组件 -->
    <AsyncComponent />
  </template>

  <!-- 加载完成前的回退内容 -->
  <template #fallback>
    <!-- 显示加载状态 -->
    <div>加载中...</div>
  </template>
</Suspense>
- 主要使用场景包括:
- 异步组件加载:结合
defineAsyncComponent实现组件懒加载 - 异步setup函数:组件内部等待异步数据获取
- 路由懒加载:配合Vue Router实现按需加载
- 异步组件加载:结合
15.v-model 的变化⭐️
- Vue 2: 一个组件仅支持一个 v-model。
在 Vue 2 中,v-model 主要用于输入元素 (如 <input>、<textarea> 和 <select>)
<input v-model="value"></input>
- Vue 3: 支持多个 v-model,并可自定义修饰符:
在 Vue 3 中,v-model 也可以在自定义组件上使用,并且可以自定义组件上的 modelValue 和 update:modelValue 事件。
<!-- 父组件 -->
<ChildComponent v-model:title="pageTitle" v-model:content="pageContent" />
16.Vue3 性能优化部分⭐️
一、响应式系统升级:Proxy vs defineProperty
| 对比项 | Vue 2 (Object.defineProperty) | Vue 3 (Proxy) |
|---|---|---|
| 初始化速度 | 递归遍历对象,一次性劫持所有属性 | 惰性劫持,仅在访问时触发依赖收集 |
| 动态属性 | 无法检测新增/删除属性(需 Vue.set) | 直接支持动态增删属性 |
| 数组处理 | 需重写数组方法(如 push) | 直接监听数组索引变化 |
| 嵌套对象 | 递归代理,性能损耗大 | 按需代理,延迟深层响应 |
- 性能影响:
- 大型对象(如 10k+ 属性)的初始化速度提升 2~5 倍(官方测试)
- 避免 Vue.set 的手动维护成本
二、编译时优化
1. 静态节点提升(Static Hoisting)
<template>
  <div>
    <h1>Static Title</h1>  <!-- 静态节点 -->
    <p>{{ dynamicText }}</p> <!-- 动态节点 -->
  </div>
</template>
- 优化效果:
- 将静态节点提取为常量,跳过虚拟 DOM 比对
- 渲染函数体积减少 30%~40%
2. Patch Flag(靶向更新)
// 编译后的代码
createVNode("div", null, [
  createVNode("p", null, text, 1 /* TEXT */) // 1 表示仅文本动态
])
- 优化效果:
- 动态节点标记类型(如 1 表示文本动态),比对时跳过无关属性
- 虚拟 DOM Diff 速度提升 50%+
3. 树结构拍平(Block Tree)
<template>
  <div>
    <div v-if="show">Block 1</div>
    <div v-else>Block 2</div>
  </div>
</template>
- 优化效果:
- 动态节点按区块(Block)组织,减少递归深度
- Diff 算法复杂度从 O(n³) 优化至接近 O(n)
三、虚拟 DOM 重写
1. 同层比较优化
- Vue 2:全量比对新旧节点树
- Vue 3:
- 通过
key和patch flag快速定位动态节点 - 跳过静态子树比对
- 通过
2. 事件缓存
<button @click="handleClick">Click</button>
- 优化效果:
- 将事件处理函数缓存,避免重复创建
- 减少 GC 压力
四、Tree-Shaking(除屑优化) 支持
- 优化原理:
- 通过 ES Module 静态分析,移除未使用的代码(如 v-model、transition 等)
五、组合式 API 的运行时优化
1. 更高效的组件实例
- Vue 2 每个实例需维护完整的选项上下文(data/watch/computed)
- Vue 3 的 setup() 按需创建响应式引用,内存占用减少 30%
2. SSR 性能提升
- 服务端渲染的字符串拼接速度提升 3 倍
- 得益于编译时的静态节点标记
17.其他变化
一、v-if 和 v-for优先级
避免 v-for 和 v-if 同级使用:优先级问题(Vue 2 中 v-for 优先,Vue 3 中 v-if 优先)